
Repotting a houseplant can be very intimidating! So, I put together this overview guide on dos and don’t of repotting houseplants! In the evergreen world of gardening, plant enthusiasts find solace and joy in the delicate art of nurturing living companions. One of the essential practices of plant care is repotting, a transformative process that breathes new life into our leafy friends. This comprehensive guide delves into the intricacies of repotting plants, exploring the why, when, and how, and uncovering the secrets to fostering a thriving botanical haven. Let’s get our repot on and keep our plants happy, healthy, and thriving!
The Significance of Repotting Plants:
Plants, like any living organisms, undergo changes and phases in their life cycle. As they grow, their root systems expand, seeking nutrients and space to spread. Repotting becomes a crucial intervention, addressing the limitations of their current containers, refreshing the soil, and promoting optimal health. This process is not just about giving your plants a change of scenery; it’s a rejuvenating experience that can make a significant difference in their overall well-being.
Why Repotting Plants Matters:
Root Expansion:
- As plants grow, their root systems outgrow their current containers. Repotting provides them with the space to stretch out, promoting healthier root development and, consequently, robust growth above the soil.
Nutrient Renewal:
- Over time, the soil in potted plants loses its nutrients. Repotting allows you to replenish the soil, ensuring that your plants have access to the essential elements they need for sustained vitality.
Preventing Root-Bound Conditions:
- Root-bound conditions occur when a plant’s roots outgrow the pot and start circling around themselves. Repotting prevents this issue, ensuring that your plants don’t face restrictions that can hinder their growth. The compacted roots can create a barrier, preventing water from reaching the entire root system. This can result in uneven water distribution and lead to dehydration or overwatering in certain areas.
Improved Drainage:
- Old, compacted soil can lead to poor drainage, increasing the risk of overwatering and root rot. Repotting with fresh, well-draining soil enhances the drainage capacity of the pot, safeguarding your plants from water-related stress.
Latest Posts
- Ultimate Guide: Caring for Your Bird of Paradise Plant
- Are Satin Pothos Easy To Care For? Propagation +(Scindapsus Pictus Care)
- Nurturing Growth: A Complete Guide to Successful Plant Repotting
- Transforming Lives and the Planet: Kickstart Your Sustainable Life
- Embracing Sustainability: Simple Ways to Make a Difference

The Dos of Repotting Plants:
- Choose the Right Time: Timing is crucial when it comes to repotting. Spring is often the ideal season for most plants, as they enter a period of active growth. However, some plants may benefit from repotting at different times, so research your specific plant’s needs.
- Select the Right Pot: The choice of a new pot is as important as the timing. Opt for a pot that is slightly larger than the current one. Ensure it has drainage holes to prevent waterlogging, maintaining a healthy balance of moisture.
- The Proper Sizing of New Pot: Choose a new pot that is 1-2 inches larger in diameter than the current one. This provides enough room for root expansion without encouraging excessive soil moisture retention.
- Use Quality Soil: Invest in a high-quality, well-draining potting mix suitable for your plant species. Different plants have varying soil requirements, so choose a mix that caters to the specific needs of your leafy companion.
- Water Before Repotting: Hydrating the soil a day or two before repotting helps ease the process. Moist soil makes it easier to loosen and remove the plant from its current pot, reducing stress during the transition.
- Gently Remove the Plant: Handle your plant with care during the extraction process. Tap the bottom and sides of the pot to loosen the soil, and then gently lift the plant out, holding it by the base of the stems.
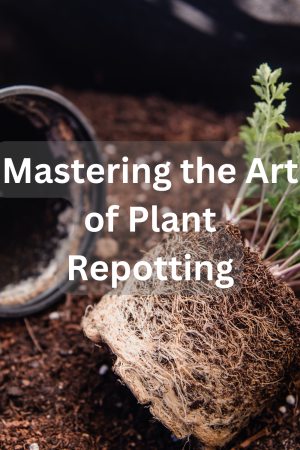
- Inspect the Roots: A crucial step in the repotting process is examining the roots. Look for signs of disease, rot, or overcrowding. Trim any damaged or rotting roots using clean and sharp scissors or pruning shears.
- Loosening Root Ball:Before repotting, gently loosen the root ball to encourage outward growth. Trim any excessively long or circling roots to promote a healthier root system.
- Add Fresh Soil: Prepare the new pot by placing a layer of fresh, nutrient-rich soil. Position the plant at the same depth as before and fill the gaps with soil, pressing it down gently to eliminate air pockets.
- Acclimate the Plant: Gradually reintroduce your plant to its normal light conditions. This minimizes shock and aids in a smoother transition, allowing the plant to adjust to its revitalized surroundings.

Don’ts of repotting plants
While repotting is a beneficial practice for plant care, there are also potential pitfalls to avoid. Here are some “don’ts” of repotting a plant to ensure a smooth transition and minimize stress for your green companions:
- Don’t Repot During Dormancy: Avoid repotting plants during their dormant period. Disturbing them when they are not actively growing can cause unnecessary stress. Wait until they enter their growing season for a more favorable repotting time.
- Don’t Choose an Overly Large Pot: Resist the temptation to select a pot that is excessively large for your plant. A pot that is too big can lead to overwatering and hinder the plant’s ability to absorb nutrients efficiently. Stick to a size that allows for modest growth.
- Don’t Neglect Proper Drainage: Never use a pot without drainage holes. Inadequate drainage can lead to waterlogged soil, causing root rot and other moisture-related issues. Always choose pots with proper drainage to maintain a healthy balance of water.
- Don’t Rush the Repotting Process: Patience is key during repotting. Rushing the process can result in damage to the plant’s roots, shock, and overall stress. Take your time to gently remove the plant from its current pot and handle it with care.
- Don’t Skip Root Inspection: Neglecting to inspect the roots is a common mistake. Check for signs of disease, rot, or pests. If you notice any issues, address them promptly by trimming damaged roots or treating for pests before repotting.
- Don’t Use Incorrect Soil: Using the wrong type of soil can have detrimental effects on your plant. Different plants have specific soil requirements, so ensure you choose a potting mix that suits the needs of your particular species.
- Don’t Overwater Immediately: Resist the urge to overwater your plant immediately after repotting. Allow the soil to settle, and water only when necessary. Overwatering can lead to root suffocation and other complications.
- Don’t Expose the Plant to Harsh Conditions: Avoid exposing your freshly repotted plant to harsh sunlight or extreme temperatures right away. Gradually acclimate it to its new environment to reduce stress and promote a smoother adjustment.
- Don’t Forget to Label: It’s easy to forget the specifics of when and how you repotted a particular plant. To avoid confusion, make a note or label the pot with the date of repotting and any relevant information. This can be especially helpful if you have multiple plants.
- Don’t Neglect Post-Repotting Care: After repotting, continue to monitor your plant closely. Ensure it receives the appropriate light, water, and nutrients. Don’t neglect post-repotting care, as this is crucial for the plant’s recovery and successful adaptation to its new home.
By being mindful of these “don’ts” of repotting, you can navigate the process with care and increase the likelihood of a positive outcome for your cherished plants. Remember, each plant is unique, so understanding its specific needs is essential for successful repotting.
Signs of plant stress (plant shock) after repotting
Plants can experience stress after repotting, and it’s essential to recognize the signs so that you can address any issues promptly. Plant shock after repotting is a common occurrence as the plant adjusts to changes in its environment, soil, and root system. Recognizing the signs of plant shock and understanding how to manage it is crucial for the well-being of your plant. Here are the typical signs and ways to help a plant recover from shock after repotting. Here are common signs of plant stress after repotting:
- Wilting: Wilting leaves are a common sign of stress. This can occur if the plant is struggling to take up water due to disrupted roots or changes in soil conditions.
- Yellowing Leaves: Yellowing of leaves, especially if it’s widespread, can indicate nutrient deficiencies, root disturbance, or shock from the repotting process.
- Drooping: Drooping or sagging of the entire plant or specific branches can be a sign of stress. It indicates that the plant is having difficulty maintaining turgidity.
- Leaf Curling: Curling or rolling of leaves can occur as a response to stress. It may be an attempt by the plant to reduce water loss.
- Slowed Growth: A noticeable slowdown in growth or the absence of new growth can be a sign that the plant is diverting energy towards recovering from the stress.
- Leaf Drop: Dropping leaves, especially if it’s more than the normal shedding of older leaves, can indicate stress. This is the plant’s way of reducing its overall water needs.
- Stunted Appearance: A stunted or generally unhealthy appearance may suggest that the plant is struggling to adapt to the new soil and container.
- Root Exposure: If roots become exposed during repotting, they may dry out and die, leading to stress. Covering exposed roots with soil can help mitigate this issue.
- Fungal or Bacterial Issues: Stressed plants are more susceptible to fungal or bacterial infections. Watch for any signs of unusual spots, lesions, or discoloration on leaves.
- Insect Infestations: Stressed plants are more attractive to pests. Check for any sudden increase in pest activity on or around the plant.
- Delayed Water Uptake: If the plant is having difficulty taking up water, it may exhibit signs of dehydration even if the soil is adequately moist.
It’s important to note that some degree of stress is normal after repotting, and plants often recover with proper care. However, severe or prolonged stress can lead to more significant issues.
Latest Posts
- Ultimate Guide: Caring for Your Bird of Paradise Plant
- Are Satin Pothos Easy To Care For? Propagation +(Scindapsus Pictus Care)
- Nurturing Growth: A Complete Guide to Successful Plant Repotting
- Transforming Lives and the Planet: Kickstart Your Sustainable Life
- Embracing Sustainability: Simple Ways to Make a Difference

Post repotting care
Caring for a plant after repotting is crucial to help it adjust to its new environment and promote healthy growth. Here are some general guidelines to follow:
- Watering: When watering for the first time. Ensure that the soil is evenly moist but not waterlogged. Adjust the watering frequency based on the plant’s specific needs and environmental conditions.
- Avoid Overwatering: Be cautious not to overwater the plant immediately after repotting. Overwatering can lead to root rot, especially when the plant is still acclimating to its new soil and pot.
- Provide Adequate Light: Place the repotted plant in an appropriate location with the right amount of light. Most plants benefit from indirect sunlight, but the specific light requirements may vary depending on the type of plant.
- Avoid Direct Sunlight: Shield the plant from direct sunlight for a few days after repotting. This helps reduce stress on the plant as it adjusts to its new soil and container.
- Monitor for Signs of Stress: Keep an eye on the plant for any signs of stress, such as wilting, yellowing leaves, or drooping. These could indicate that the plant needs time to recover from the repotting process.
- Humidity: Maintain consistent humidity levels, especially if the plant is sensitive to changes in moisture. You can use a humidity tray or a humidifier to create a suitable environment.
- Fertilize Carefully: Hold off on fertilizing the plant immediately after repotting. Give it a few weeks to settle into its new home before introducing any additional nutrients.
- Pruning: Consider pruning if the plant has experienced some stress during repotting. Remove any damaged or yellowing leaves to encourage new growth.
- Stabilize the Plant: If the plant seems wobbly in its new pot, stabilize it by adding more soil or gently pressing down around the base. Ensure that the plant is secure and won’t topple over.
- Give Time to Adjust: Be patient. Plants need time to adjust to changes, and some may take a few weeks to recover fully. Avoid making additional changes or adjustments during this period.
- Regular Monitoring: Continue to monitor the plant regularly for any signs of improvement or issues. Adjust care routines based on the plant’s response.
Remember that each plant may have specific care requirements, so it’s essential to consider the individual needs of the plant species you are repotting. Tailor your care approach based on factors such as light preferences, water requirements, and growth habits.
Conclusion:
In the intricate dance between humans and nature, repotting plants emerges as a transformative act of care. This comprehensive guide unravels the mysteries of repotting, emphasizing its significance in the life cycle of plants. As you embark on the journey of nurturing your botanical companions, embrace the dos of repotting, and witness the flourishing beauty that unfolds in your green sanctuary.

Hey hey hey! Welcome to Mindful Monstera, I write about food, plants and more!
